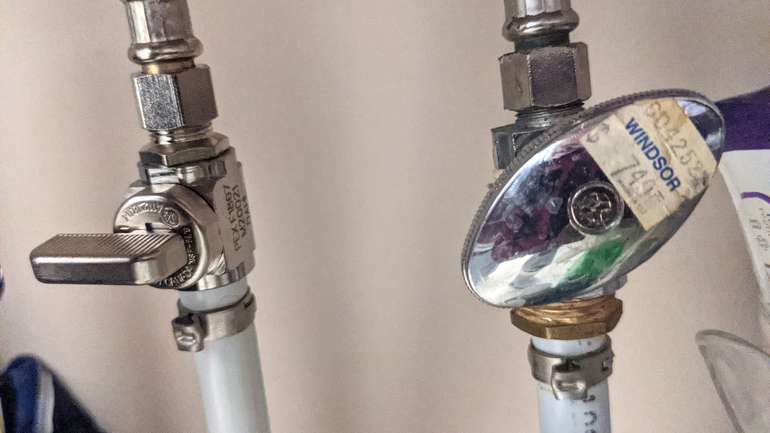
The author is making several great pointers on How to FIX LEAKY quarter turn FAUCETS in general in this great article underneath.
Is your faucet dripping or leaking? Drip, drip, drip! It's very simple to take care of a dripping tap by following this mini-guide.
Replace the Rubber Bands
From there, you should change the washer, which is generally discovered in the base of the stem within the valve seat. It would certainly be best to replace both to make sure that the dripping quits. Otherwise, you will certainly still hear the drips.
Shut off Your Water Supply
Prior to you attempt to repair your leaking faucet, you must turn off that water system that feeds it fresh water. Should you fail to remember to do this, you will come across a large mess, manage water damage, and also cleanup. There's no requirement to touch the mainline so that other people can make use of the water in other parts of that home. You can usually discover the regional valve in a neighboring cabinet or under the sink. Usually, there are 2 shutoffs, one for the chilly and also the various other for the hot water supply. Turn them both off by transforming the knob counterclockwise. Determine that Visit Website water is reduced by turning on the tap.
Secure the Handle Knob
As soon as all the water is reduced, you can wage eliminating the attractive cap off the handle knob using your level head screwdriver. As soon as the cap is off, you will certainly see a tiny screw that secures the take care of to the stem of the faucet. Remove this screw with your Phillip's screwdriver so you can pry the deal with from the stem.
Get Rid Of the Tap Stem
Depending on your faucet setup, the stem will conveniently pop out, or you will have to twist it off the valve. When the stem is eliminated, inspect the components for wear and also tear.
Preparation Your Devices for Fixing
You could already have the tools stashed in your toolbox if you're a handyman. Should you miss some tools, you can readily buy these in any hardware store. You will certainly require the following:
Return the Faucet in Place
Once you have actually replaced the washing machine and O-ring, you need to reassemble the tap by following the reverse order of elimination. When it's back in place, examination Click Here To Read More it out by turning on the water supply as well as faucet.
Is your faucet leaking or leaking? Drip, drip, drip! It would certainly be best to replace both to make sure that the trickling stops. Or else, you will still listen to the drips.
Before you try to fix your dripping faucet, you need to turn off that water supply that feeds it fresh water.
5 Easy Steps to Fix a Dripping or Leaking Faucet
Turn Off the Water Supply
Before you start dismantling your faucet, make sure you turn off the water supply that’s feeding it. If you forget to turn the water off, then you’re going to be in for a major mess. If the faucet you’re fixing is a sink faucet, then the shut-off valve should be located directly under it inside of the vanity or cabinet.
There will be two shut-off valves, one for the hot side and one for the cold side. Shut them both off by turning the handles clockwise until they can’t turn any more. Turn both taps on to make sure no water comes out of the faucet, so you know that the flow of water has been stopped.
Remove the Handle Knob
Use the flat head screwdriver to pry off the decorative cap on top of the handle knob. This will expose a small screw that is used to mount the handle to the stem. Remove the screw and then pull the handle off of the stem.
Remove the Stem
Take the C-wrench, or adjustable wrench, and loosen the packing nut to reveal the stem. Depending on your faucet’s style and manufacturer, the stem will either pop right off, or it will have to be twisted off of the valve. Once the stem is removed, check all of the parts for any signs of damage.
Replace the O-Rings and Washer
The O-ring is the thin rubber ring that sits around the mid-point of the stem, while the washer is located at the bottom of the stem, inside the valve seat. Either one could be the reason for the leak, so it always pays to replace both while you have the stem exposed.
When replacing O-rings and washers, it is crucial to make sure the replacements are an exact fit. If necessary, take the old O-ring and washer to your local hardware store to help ensure you choose the correct size.
https://www.homes.com/blog/2016/03/5-easy-ways-fix-dripping-leaking-faucet-home/
As a devoted reader on How to FIX LEAKY quarter turn FAUCETS, I figured sharing that editorial was worth the trouble. Those who enjoyed reading our blog entry if you please remember to pass it around. Thank-you for taking the time to read it.